
Disc golfers have never had as many options for where to play as they do now. The world has over 16,000 disc golf courses, and that number is growing every day.
Great photos of your course in the most popular disc golf course directory, UDisc Courses, can help it stand out from the crowd. They can attract local players who want to try something new, convince regional players to make a road trip, or assure disc golfers planning business trips or vacations that it's worthwhile to toss a few discs in their suitcases.
Since players who find courses with UDisc are likely to score their rounds with UDisc, those extra plays matter. Disc golf courses are often built in public spaces like town parks, and UDisc stats of play counts, recreation hours provided, steps taken, and more at a course help prove that it's a valuable community asset that's worth the space it takes up and public expenses that go to maintenance.
If a disc golf course is a pay-to-play business, having great photos in the most widely-used disc golf course directory is almost certain to help the bottom line.
When funds allow for it, hiring a professional photographer is clearly ideal.
"Brides, grooms, and guests all have that friend that claims to be a photographer, but would you trust them to photograph your wedding?" asked Cy Cyr, a Maine-based professional photographer, rhetorically. "Probably not, so you hire a pro. The photos of your course or business are a reflection of your product and should be treated as such."

If a professional photo shoot isn't in the budget, though, modern smartphones provide a viable alternative.
"Many phones have very capable cameras these days and have all the tools you need to capture some great photos," said Alex Grosse, a pro photographer based in Charlotte, North Carolina.
But the same way it's rare for amateur disc golfers to hammer distance drivers over 400 feet/122 meters without serious practice, you probably won't capture great course photos without some knowhow.
Using input from Cyr, Grosse, and longtime disc golf photographer Lauren Lakeberg, we've put together a guide to the fundamentals of taking great disc golf course photos. We also cover how to feature those photos on UDisc so they'll have maximum impact and visibility.
Read it all to get the full picture (pun absolutely intended), or jump to a topic that interests you by selecting it in the navigation below.
Post Navigation
- Meet our sources, three experienced photographers
- What should you include in a great disc golf course photo?
- Basic tips for taking better photos in general
- The best times to take photos
- Big don'ts for UDisc Courses photos
- How Course Ambassadors can use Course Tools from UDisc to optimize a courses' photo gallery
Meet the Photographers
Get to know the three accomplished photographers who shared their knowledge and made this post possible.
Cy Cyr

After his first serious introduction to the art form in a high school class, Cy Cyr attended a photography school in Massachusetts after graduation. There he learned the tricks of the trade that helped him move into professional photography.
Basing his business on working hard, being dependable, and producing top-notch photos, he's worked with the Golf Channel on still photography projects since 2010 along with many other customers. His portfolio includes portraits of well-known figures like golf star Rory McIlroy, women's soccer phenom Alex Morgan, and motivational speaker Tony Robbins.
He's photographed many golf courses for the Golf Channel, and the strategies he's learned from that work translate well to disc golf courses.
Learn more about Cyr and see more of his work at Cy Cyr Photography.
Alex Grosse
Alex Grosse believes his fascination with photography started at age seven when his grandfather showed him projector slides of a camping trip in the Rockies. The slides included shots of Grosse's father as a very young boy, and Grosse still remembers being "perplexed" by how the images preserved a version of his dad from a time when he was very different from the person Grosse saw every day.
In middle school, Grosse started filming content for his own YouTube channel. This pursuit got him interested in the technical sides of film, photography, and editing visual media. While in high school, he landed a job at a local photographer's shop, which allowed him to work hands-on with professional equipment and learn more advanced techniques. After college he lived in Los Angeles, honing his skills via a variety of creative undertakings for six years.
Today, Grosse is a freelance professional photographer based in Charlotte, North Carolina. His client list includes companies as well-known as Goodyear and NASCAR. He also recently completed a project for us at UDisc, which is how we got to know him.
See more of his work at Alex Grosse Photo.
Lauren Lakeberg
Obsessed with the effects of light since a very young age, Lakeberg was always the photographer on family vacations and became more serious about the pursuit after taking a darkroom photography class in high school. Earning a B.A. in photography from Columbia College Chicago, she was particularly inspired by a class with Pulitzer Prize-winning photojournalist John H. White who urged students to "have a pro's eye but a rookie's spirit."
Lakeberg has been photographing disc golf courses and events for over two decades. That work included being the first photographer for the Disc Golf Pro Tour when it started in 2016.
See and learn more at Lauren Lakeberg's website, The Disc Golf Photographer.
What Should Be in a Great Disc Golf Course Photo?
The best photos of disc golf courses do two things:
- Make sure people know they're looking at a disc golf course.
- Capture an image that's visually compelling to almost any audience.
When most disc golfers peruse photos on UDisc, they're hoping to better understand if a course – not the surrounding area of a park or a nearby hiking trail – is a place they're likely to enjoy. So it's important that the photos make it clear to viewers that they feature on-course locations.
"The best photos of disc golf courses incorporate elements of the sport itself," Grosse said. "The frame needs context."
He mentioned "tee pads, baskets, disc markers, and challenging lies" as possible context-giving elements.
But it's important to note that Grosse's suggestion is to use disc golf equipment as context in a photo – not have it completely dominate your images. As Lakeberg pointed out, "what [people] don’t want is just pictures of tee signs, just the baskets."
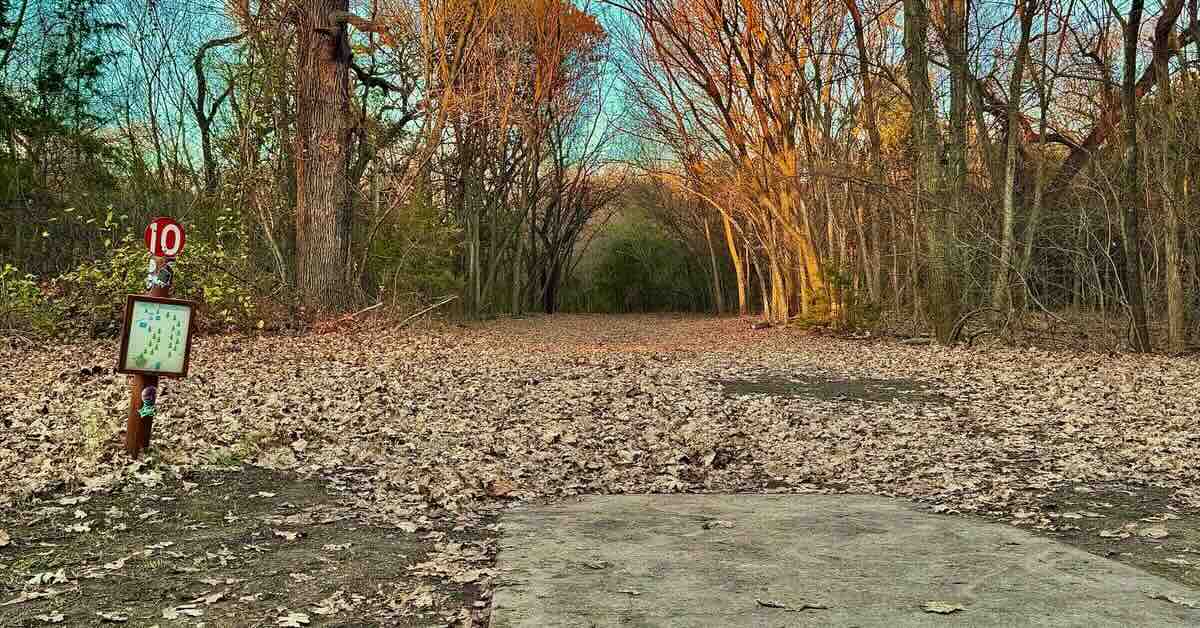
Think about it: Would 18 close-ups of everyday disc golf baskets, tee signs, or tees (things most decent courses have) get you amped up to play a course? Probably not.

For an example of a solid course photo, look at the shot above captured at Lincoln Park North Disc Golf Course in Illinois. The tee (offset to the right of center) and position of the hole number post let us know we're looking down a fairway, but we're more compelled by the shadow-covered rolling hills and the effect of the sunlight streaming through the mist.
This exact technique is one Cyr suggested: Photographing fairways from behind their tees, letting the tee provide disc golf context while the fairway keeps eyes lingering. He also recommended trying out positions behind baskets while looking back toward tees.
Tips to Make Any Photo Better
Just like a band being off-beat or out of tune can ruin a great song, you can take a photo of an interesting scene that includes disc golf equipment and still end up with a "blah" image if you don't keep to a few basics of good photography.
Cyr pointed out "the rule of thirds" as a standard he recommends having in mind.
"Imagine dividing your image into a grid of nine equal parts by two horizontal and two vertical lines," Cyr explained. "The idea is to position key elements along these lines or at their intersections, which naturally draws the viewer's eye and creates a more dynamic, balanced, and visually interesting composition."
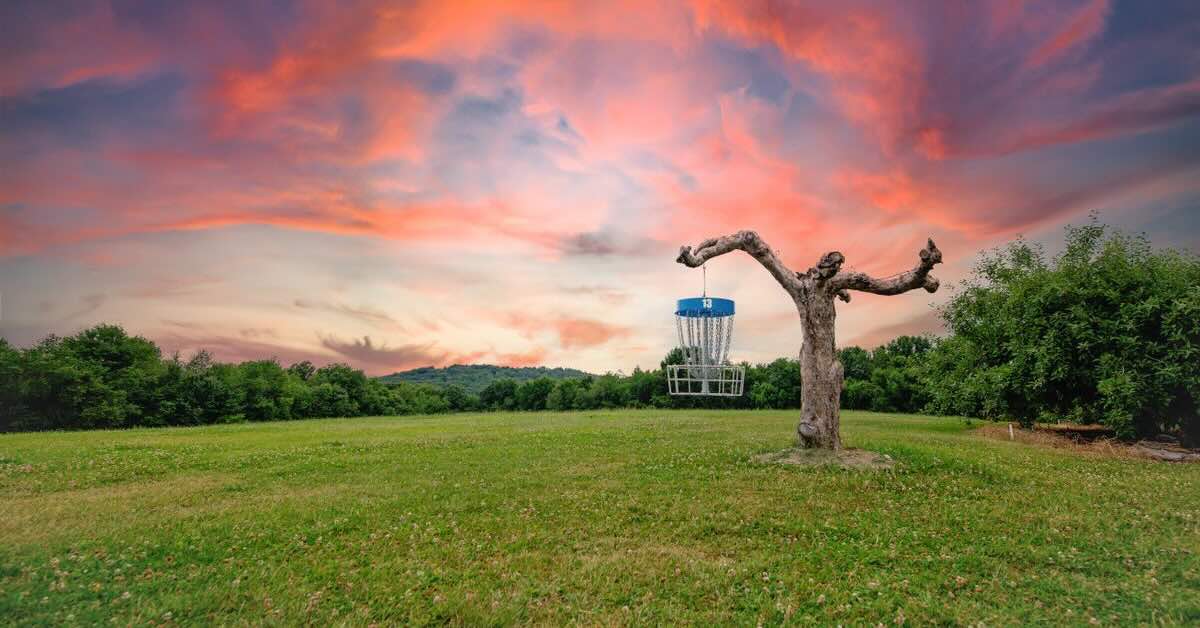
Remember that stunning sunset photo with the hanging basket at the top of this post? Here's what it looks like divided by the grid Cyr described:
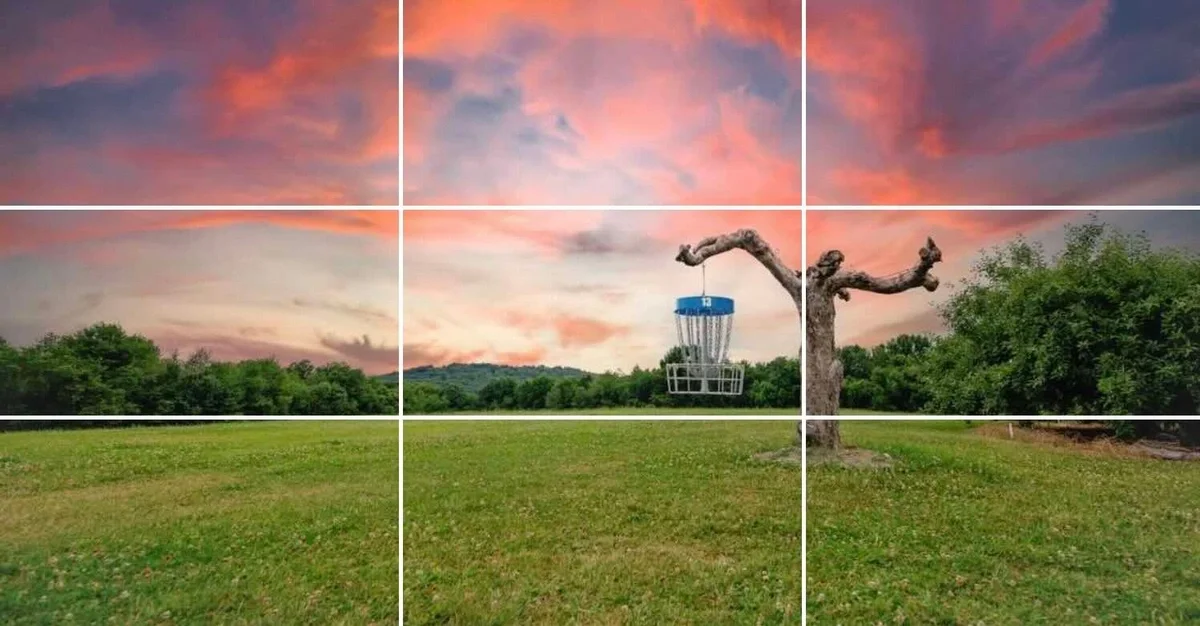
With the grid as context, you can see that it's not just the sunset colors and unusual basket placement that please the eye so much. Balance matters, too. The grass takes up the bottom third of the photo; the center third consists of trees, bushes, and hanging basket; and the top third is the pink-tinged clouds.
Notice, too, how the basket is just off center frame. That's another reason the photo is so compelling.
"Many people frame the subject in the very center of the photo," Grosse said. "This isn't necessarily an issue for every shot, but it often works better to frame the subject just to the left or right of center to draw the viewer's eye in more effectively."
Another easy way to make your photos stand out is to take them from positions that give your audience an uncommon perspective.
"Change your perspective and get high and low," Lakeberg suggested.
Grosse offered the same advice and said that shooting from high and low angles sparks interest because it "break[s] up the standard eye level shot we see so often."
To see an example of how effective this can be, take a look at this photo of a hole on the Beaver layout at Lester Lorch Disc Golf Course in Texas:
Whereas it would be easy to take a very unflattering photo of this scene with its tee sign that's seen better days, bare winter trees, and dirty tee pad, this photo's composition helps us look past much or all of those things. A big reason? It's taken from a low position very near the ground, which is both more unexpected than eye-level and also helps to emphasize how the high branches of the trees arc to form the tunnel fairway.
It was also taken at a superb time of day for photography, which we get into in the next section.
The Best Times to Take Disc Golf Course Photos
As all of our sources independently confirmed, mornings and evenings are typically the best times to take compelling photos of disc golf courses. In photography, the period right after sunup or right before sundown is known as "the golden hour" due to the favorable lighting.
Along with the possibility of stunning sunrises and sunsets, these times of day can create compelling landscapes of mixed long shadows and slanting light due to sunlight coming in from the sides rather than more directly overhead. When it's midday, that differentiation often disappears and can make photos fall flat.
"Contrast is what makes an image interesting, and that will make your 2D photo come to life!" advised Lakeberg.
For an example of golden hour power, check out an image from Krokhol Disc Golf Course in Norway that morning mist and the sun's angle turn into a magical moment:
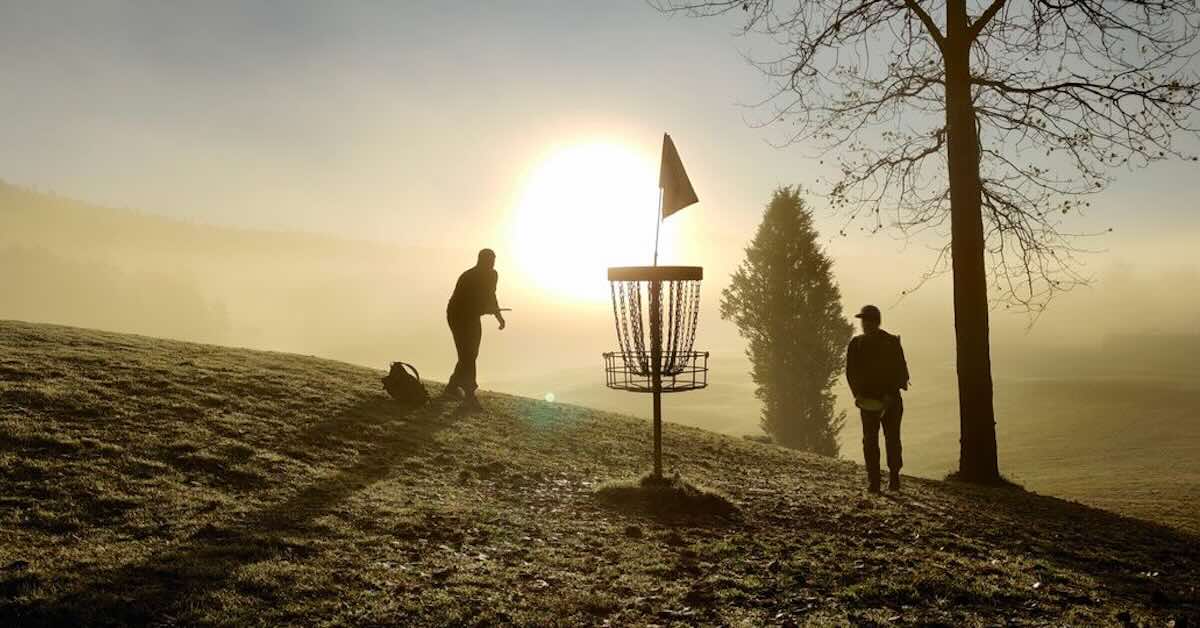
At other times of day, this could easily be just another photo of someone putting to a basket in an open area while a buddy looks on. Here, the low morning light comes from directly behind the the two players, making them dark silhouettes that contrast with the bright morning sun. What could be a pretty typical disc golf scene transforms into a compelling, dramatic image.
Though the right mornings and evenings can make almost any scene lovely and magical, keep one rule in mind: Always let the sun shine from your sides or directly at you – but almost never from behind you.
"If the sun is at your back, the lighting will appear to be pretty flat," Cyr advised.
Can't get out to photograph in the morning or evening? Grosse said that cloudy days with moments of sun peeking through the clouds "can look nice and create drama."
What Should You Avoid in Your UDisc Course Photos?
UDisc strives to make disc golf courses as easy to understand and navigate for players as possible. For most courses with attentive Course Ambassadors, maps with tee and basket locations, hole distances, and more for all your layouts are easily accessible to anyone checking out your course in the app or online. They'll also see a live map of tee and basket locations as they play.
Additionally, you can associate every photo with the hole it's from, and that hole number will appear in a caption created by UDisc when players view the photo in the app or online.
All this means your course photography can focus on being visually engaging and doesn't need to offer basic hole or course information.
We're pointing this out because it's fairly common to see photos on UDisc Courses that include added visuals and/or text clarifying where fairways go, distant basket positions, hole rules, and other basic information. For one, all that work is unneeded given the information available to players via UDisc. Additionally, these sorts of images almost always make courses' photo galleries less visually appealing.

Something else we suggest avoiding is using a course information board (whether a close-up of an installed board or the original image file) as the lead image for your course. Think about it this way: Would you more likely be interested in an AirBnB listing that led with an informational illustration showing the layout and dimensions of its rooms or a photo of its cozy living room with a nice view?
How to Use UDisc to Optimize Your Disc Golf Course's Photo Gallery
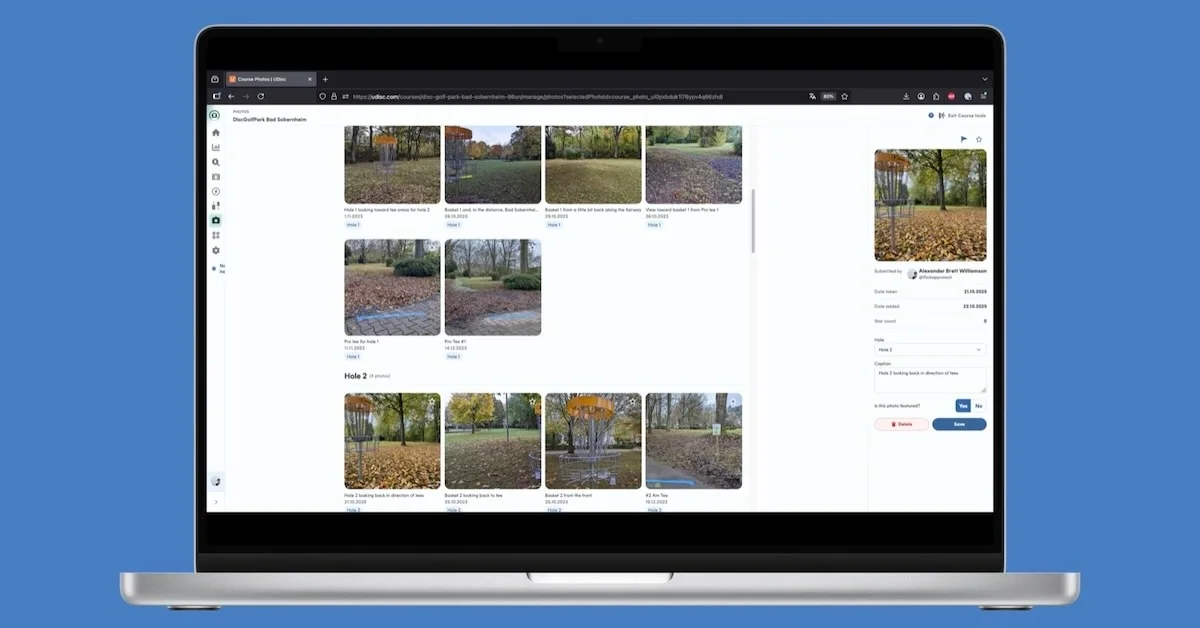
If you're a Course Ambassador, you can easily optimize a course's gallery with Course Tools. Here's a list of what you can do:
- Select feature photos
Choose up to six photos disc golfers with UDisc see first when they check out your course. The first feature photo will be the sole photo disc golfers see in the sidebar on the web version of UDisc Courses or if they use the "List" view to search for courses in the app. If a UDiscer clicks/taps a course from there, the other feature photos will appear in smaller thumbnails beside the first on the web or be scrollable at the top of a course's entry in the app. - Connect photos to holes
All photos can be tied to a hole number. If UDiscers view your photo gallery, all photos after the six feature photos show up in order of the hole they're connected to (i.e., hole 1 photos come first, hole 2 photos second, etc.) - Add captions
Want to give a photo context (e.g., "Looking back at the tee from the basket" or "The water in this one is casual")? Just add a caption to any photo. - Remove outdated or unrepresentative photos
Once a photo is added to UDisc Courses and approved, it usually stays there unless it's removed by a Course Ambassador. This means if a course has had major upgrades or undergone repairs that older photos don't reflect, a Course Ambassador may want to go through the gallery and delete images that will give UDiscers a false impression of what the course is like to play.
Not sure how to access these tools? Check out a section on photos in our Course Ambassador Guide.
Feeling Snappy?
If you took in all the advice above, you should be well on your way to taking great photos of courses you care about – helping everyone to see the same beauty in them that you do. As long as you have a modern smartphone, your camera is likely good enough to take some compelling photos.
We encourage you to get out there with these tips in mind and see what comes of it. Hopefully, your efforts will pay off in your course getting all the plays and attention it deserves.
